


Recent post

Hello codingers Back to me Narumi x ini saya akan membahas mengenai javascript coditional dll langsung aja ke pembahasannya gassss...
JAVASCRIPT CONDITIONS
Conditional statements are used to perform different actions based on different conditions , you need to use conditional statements that allow your program to make correct decisions and perform right actions.
In JavaScript we have the following conditional statements:
- Use if to specify a block of code to be executed, if a specified condition is true
- Use else to specify a block of code to be executed, if the same condition is false
- Use else if to specify a new condition to test, if the first condition is false
- Use switch to specify many alternative blocks of code to be executed
if Statement
if statement is used to specify a JavaScript code to be executed if a condition is true , here a JavaScript expression is evaluated , If the resulting value is true then the given statements are executed. If the expression is false, then no statement would be not executed.
if Statement Syntax
if (condition) {
code to be executed if the condition is true }
else Statement
The else statement is used to specify a Javascript code to be executed if the condition is false.
else Statement Syntax
if (condition) {
code to be executed if the condition is true } else {
code to be executed if the condition is false }
else if Statement
The else if statement is used to specify a new condition , if the first condition is false , the Else If statement is an extension to the If Statement that allows you to create as many conditional statements as you want .
else if Syntax
if (condition1) {
code to be executed if condition1 is true } else if (condition2) {
code to be executed if the condition1 is false and condition2 is true }
else {
code to be executed if the condition1 is false and condition2 is false }
Exampe for javaScript Conditions
<!DOCTYPE html>
<html>
<body>


<h3>This is the example of if
Statement </h3>

<p>Click the button to know your
driving eligibility</p>

<button onclick="myFunction()">
Try it</button>

<p id="demo"></p>

<script>

function myFunction() {

var message;
var age = 23 ;

if (age > 19) {
message="you are eligible to drive";
}

document.getElementById("demo")
.innerHTML = message;

}

</script>


<h3>This is the example of else
Statement </h3>

<p>Click the button to know your
driving eligibility</p>

<button onclick="myFunction1()">
Try it</button>

<p id="demo1"></p>

<script>

function myFunction1() {

var message1;
var age = 1;

if (age > 19) {
message1="you are eligible to drive";

} else {
message1= "not eligible to drive";

}


document.getElementById("demo1")
.innerHTML = message1;
}

</script>


<h3>This is the example of else if
Statement </h3>

<p>Click the button to know your
driving eligibility</p>

<button onclick="myFunction2()">
Try it</button>

<p id="demo2"></p>

<script>

function myFunction2() {

var message2;

var age = 19;

if (age < 19) {
message2 = "not eligible to drive";

} else if (age > 19) {
message2="you are eliglibe to drive";

} else {
message2="you have just turned 19!";
}

document.getElementById("demo2")
.innerHTML = message2;
}

</script>

</body>
</html>
Result for the above Example :
This is the example of if Statement
Click the button to know your driving eligibility
you are eligible to drive
This is the example of else Statement
Click the button to know your driving eligibility
not eligible to drive
This is the example of else if Statement
Click the button to know your driving eligibility
you have just turned 19!
JAVASCRIPT SWITCH
The switch statement is used to give an expression to evaluate several different statements to execute based on the value of the expression. The interpreter checks each case against the value of the expression until a match is found. If nothing matches, a default condition will be used.
JAVASCRIPT SWITCH SYNTAX
switch(expression) {
case n: Code Statment
break;
case n: Code Statment
break;
default: Default Code Statment
}
- The switch expression is evaluated once.
- The value of the expression is compared with the values of each case.
- If there is a match, the associated block of code is executed.
- The break statements indicate the end of a particular case , this will stop the execution of more code and case testing.
- The default keyword specifies the code to run if there is no case match .
Example For JavaScript Switch
<!DOCTYPE html>
<html>
   <body>
<h2>Example For JavaScript Switch
</h2>


<h3>Enter your grade to know
your marks</h3>


<script>

var grade='U';

document.write("GradeMarks Range :");

switch (grade)

{

case 'S': document.write
(" 91 to 100 Marks");
break;

case 'A': document.write
(" 81 to 90 Marks");
break;

case 'B': document.write
(" 71 to 80 Marks");
break;

case 'C': document.write
(" 61 to 70 Marks");
break;

case 'U': document.write(" Failed");
break;

default:  document.write
("Unknown Grade<br />")

}


</script>

</body>

</html>
Result for the above Example :
JAVASCRIPT LOOP
While writing a HTML program, you may encounter a situation where you need to perform an action over and over again. In such situations, you would need to write loop statements to reduce the number of lines.
Different Kinds of Loops
JavaScript supports different kinds of loops they are :
- for - loops through a block of code a number of times.
- for/in - loops through the properties of an object.
- while - loops through a block of code while a specified condition is true.
- do/while - also loops through a block of code while a specified condition is true.
Syntax For JavaScript loop
For Loop :
for (statement 1; statement 2; statement 3) {
code to be executed
}
While Loop :
while (condition)
{
code to be executed
}
Example for For Loop
<!DOCTYPE html>
<html>
<body>

<h3>  Example for For Loop </h3>

<p>Click the button to loop through
a block of code five times.</p>

<button onclick="Function()">
Try it</button>

<p id="Sample"></p>

<script>

function Function() {
var text = "";
var i;

for (i = 1; i < 6; i++) {
text += "The number is " +i+ "<br>";
}

document.getElementById("Sample")
.innerHTML = text;
}

</script>

</body>
</html>
Result for the above Example :
Example for For Loop
Click the button to loop through a block of code five times.
The number is 1
The number is 2
The number is 3
The number is 4
The number is 5
JavaScript For/In Loop
The for/in loop is used to loop through an object's properties.In each iteration, one property from object is assigned to variablename and this loop continues till all the properties of the object are exhausted.
Example for For/In Loop
<!DOCTYPE html>
<html>
<body>

<h3>Example for For/In Loop </h3>

<p id="sample"></p>

<script>

var txt = "";
var person = {name:"John",
gender:"Male", age:28};
var x;

for (x in person) {

    txt += person[x] + " ";
}

document.getElementById("sample")
.innerHTML = txt;

</script>

</body>
</html>
Result for the above Example :
While Loop
The purpose of a while loop is to execute a statement or code block repeatedly as long as an expression is true, once the expression becomes false, the loop terminates.
Example For While Loop
<!DOCTYPE html>
<html>
<body>

<h3> Example For While Loop </h3>


<p>Click the button to loop through
a block of code as long as i is
less than 12.</p>

<button onclick="Function()">
Try it</button>

<p id="sample"></p>

<script>

function Function() {
var text = "";
var i = 1;

while (i < 12) {
text += "<br>The number is " + i;
i++;
    }

document.getElementById("sample")
.innerHTML = text;

}

</script>

</body>
</html>
Result for the above Example :
Example For While Loop
Click the button to loop through a block of code as long as i is less than 12.
Do/While Loops
The do/while loop is similar to the while loop except that the condition check happens at the end of the loop. This means that the loop will always be executed at least once, even if the condition is false. Then it will repeat the loop as long as the condition is true.
Example For Do/While Loop
<!DOCTYPE html>
<html>
<body>

<h3>Example For Do/While Loop </h3>

<p>Click the button to loop through
a block of code as long as i is
less than 12.</p>

<button onclick="Function()">
Try it</button>

<p id="sample"></p>

<script>

function Function() {
var text = ""
var i = 1;

do {
text += "<br>The number is " + i;
i++;
}

while (i < 12)
document.getElementById("sample")
.innerHTML = text;
}

</script>

</body>
</html>
Result for the above Example :
Example For Do/While Loop
Click the button to loop through a block of code as long as i is less than 12.
The number is 1
The number is 2
The number is 3
The number is 4
The number is 5
The number is 6
The number is 7
The number is 8
The number is 9
The number is 10
The number is 11
TRY YOURSELF
Ingfo Selengkapnya?
W3school.com
Next upload ?share in kolom komentar:)
OKE SIMAK BAIK BAIK BAIR PAHAM
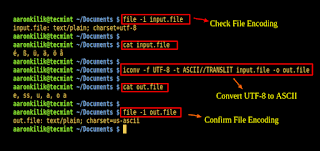
Pengertian Meta tag Charset UTF-8 pada HTML5
Pengertian Meta tag
Meta tag adalah ‘data tentang data‘, dimana tag ini ditujukan bukan kepada user, tetapi kepada web browser atau kepada ‘robot program‘ seperti mesin pencari (search engine).
Mengenal meta-tag charset UTF-8
Charset UTF-8 merupakan meta tag yang paling sering digunakan dalam HTML5, penulisannya adalah sebagai berikut:
1 | <meta charset="UTF-8"> |
Meta tag diatas memberi instruksi kepada web browser untuk menerjemahkan karakter-karakter di dalam halaman HTML sebagai UTF-8. Walaupun bersifat opsional, hampir setiap halaman HTML5 menggunakan meta tag ini.
Sejarah Charset (Karakter Set) HTML
Instruksi charset digunakan untuk menerjemahkan bit-bit di dalam halaman HTML menjadi karakter.
Karakter set paling sederhana dan juga paling awal digunakan adalah karakter set ASCII, (dalam HTML ditulis sebagai charset=”us-ascii”). Karakter set ini terbatas pada huruf latin (a-z, A-Z) dan beberapa karakter lain seperti angka, spasi, tab, dll dengan total hanya 128 karakter.
Karakter set “us-ascii” kemudian dikembangkan menjadi karakter ANSI, atau dikenal juga sebagai ISO-8859-1 (dalam HTML ditulis sebagai charset=”ISO-8859-1”). Karakter ANSI mendukung 256 karakter, dan umumnya digunakan pada HTML versi 2.0 sampai dengan HTML 4.01.
Pemasalahan pada karakter set ASCII maupun ANSI adalah tidak menyertakan karakter non-latin seperti huruf arab, cina, jepang, dll. Untuk keperluan ini dikembangkan berbagai karakter set untuk masing-masing bahasa, seperti big5 untuk karakter cina, x-euc-jp untuk karakter jepang, iso-8859-7 untuk karakter yunani dll. Sehingga untuk setiap web, penulisan karakter set akan berbeda-beda tergantung bahasa apa yang digunakan untuk menulis halaman HTML. Tentunya akan lebih praktis jika seluruh karakter ini disatukan kedalam sebuah karakter set.
Pada awal perkembangan XHTML, diperkenalkan karakter set UTF-8 (Unicode Transformation Format-8) yang mendukung hampir seluruh karakter yang ada di dunia. Dalam perkembangan selanjutnya, HTML5 juga menggunakan UTF-8 sebagai charset standar. Dengan menggunakan UTF-8, kita tidak perlu khawatir mengenai karakter atau bahasa apa yang akan digunakan. UTF-8mendukung hingga lebih dari 10.000 karakter.
Cara Penulisan meta tag Charset UTF-8
Dalam HTML 4.01 maupun XHTML, penulisan karakter set lebih panjang, seperti contoh berikut:
1 | <meta http-equiv="content-type" content="text/html;charset=UTF-8" /> |
Dalam HTML5, penulisannya disederhanakan menjadi:
1 | <meta charset="UTF-8"> |
Meta tag charset ini ditempatkan pada bagian <head> sebelum tag <title>, seperti contoh berikut:
1 2 3 4 5 6 7 8 9 10 | <!DOCTYPE html><html><head> <meta charset="utf-8"> <title>Belajar HTML5</title></head><body> <h1>HTML5</h1> <p>Belajar HTML5 di rumah</p></body> |
Pentingnya Menggunakan Charset
Walaupun sepenuhnya opsional, penulisan meta tag charset sangat dianjurkan. Jika kita tidak menuliskan charset, web browser akan mencoba ‘menebak‘ karakter yang digunakan (biasanya web browser modern akan menggunakan utf-8 sebagai karakter default). Jika halaman web dijalankan dari web server seperti Apache, web server juga akan menambahkan http-header yang berisi karakter set.
Namun perlu menjadi catatan bahwa jika kita tidak menulis meta tag charset, proses web browser ‘menebak‘ karakter set ini bisa menjadi masalah. Pada tahun 2005 terdapat sebuah bug pada Internet Explorer yang dinamakan Google XSS. Hal ini terjadi karena situs google tidak menuliskan karakter set sehingga bisa digunakan untuk menyisipkan kode javascript. Oleh karena itu, sebaiknya kita selalu menambahkan meta tag charset pada setiap halaman HTML.

Fungsi Atribut Rowspan and Colspan
Atribut rowspan and colspan digunakan untuk membuat sel tabel ‘bersatu’ dengan sel yang lain. Atribut ini diletakkan pada tag td dari sebuah tabel. Agar mudah memahami, langsung saja kita buat contoh kode HTMLnya.
Buka aplikasi text editor, ketikkan kode berikut, dan save sebagai tabelspan.html
Contoh penggunaan atribut rowspan and colspan:
1 2 3 4 5 6 7 8 9 10 11 12 13 14 15 16 17 18 19 20 21 22 23 24 25 26 27 28 29 | <!DOCTYPE html><html><head><title>Contoh Penggunaan Atribut Colspan dan Rowspan Tag Tabel</title></head><body><h1>Contoh atribut colspan dan rowspan </h1><table border="1"> <tr> <td>Baris 1, Kolom 1</td> <td>Baris 1, Kolom 2</td> <td>Baris 1, Kolom 3</td> </tr> <tr> <td>Baris 2, Kolom 1</td> <td colspan="2" >Baris 2, Kolom 2 & 3</td> </tr> <tr> <td rowspan="2"> Baris 3 & 4, Kolom 1</td> <td> Baris 3, Kolom 2</td> <td> Baris 3, Kolom 3</td> </tr> <tr> <td> Baris 4, Kolom 2</td> <td> Baris 4, Kolom 3</td> </tr></table></body></html> |
Dalam contoh diatas, kita dapat melihat bahwa tag td yang memiliki atribut colspan, akan membuat sel tabel bersatu dengan kolom disebelahnya. Sedangkan atribut rowspan akan membuat sel tabel bersatu dengan baris dibawahnya. Kedua atribut ini membutuhkan nilai (value), dimana nilai ini adalah seberapa banyak sel tabel yang dibuat ‘bersatu’.
Misalkan colspan=’3’ akan membuat 3 kolom bergabung menjadi 1 sel, dan rowspan=’2’ akan membuat sel tabel bersatu dengan 1 baris dibawahnya.
Dalam membuat tabel dengan atribut rowspan dan clospan, anda sebaiknya telah mengkalkulasi seberapa besar tabel yang akan dibuat, karena dengan semakin kompleks tabel, akan semakin rumit untuk menggabungkan beberapa sel tabel tersebut.

Mengenal Atribut Border, Cellpadding dan Cellspacing dalam Tabel
Atribut border dalam tabel HTML
Atribut border digunakan untuk mengatur ketebalan dari garis tepi (border) dari tabel. Jika atribut ini tidak ditulis, maka web browser akan menampilkan tabel tanpa garis tepi.
Nilai dari atribut ini berupa angka yang diukur dalam satuan pixel. Jika anda memberikan nilai border=”2″, maka web browser akan menampilkan garis tepi sebesar 2 pixel pada sisi atas, bawah, kiri dan kanan tabel.
Berikut adalah contoh penggunaan atribut border dalam tag table HTML:
1 2 3 4 5 6 7 8 9 10 11 12 13 14 15 16 17 18 19 20 21 22 23 24 25 26 27 28 29 30 31 32 33 34 35 | <!DOCTYPE html><html><head><title>Penggunaan atribut border dalam Tabel</title></head><body><h3>Belajar atribut border dalam Tabel</h3><table border="0"> <tr> <td>Baris 1, Kolom 1</td> <td>Baris 1, Kolom 2</td> <td>Baris 1, Kolom 3</td> </tr> <tr> <td>Baris 2, Kolom 1</td> <td>Baris 2, Kolom 2</td> <td>Baris 2, Kolom 3</td> </tr></table><br /><table border="6"> <tr> <td>Baris 1, Kolom 1</td> <td>Baris 1, Kolom 2</td> <td>Baris 1, Kolom 3</td> </tr> <tr> <td>Baris 2, Kolom 1</td> <td>Baris 2, Kolom 2</td> <td>Baris 2, Kolom 3</td> </tr></table></body></html> |
Dengan memberikan nilai ‘0’ kepada atribut border, tabel seolah-olah tidak memiliki garis tepi.
Perhatikan bahwa jika anda mengubah border=”1″ menjadi border=”5″ misalnya, maka garis border yang terkena efek hanya border pada sisi luar tabel, namun tidak untuk garis border di dalam tabel.
Atribut cellpadding dalam tabel HTML
Atribut cellpadding digunakan untuk mengatur jarak dari border sisi dalam tabel dengan isi text tabel itu sendiri.
Nilai dari atribut ini berupa angka yang diukur dalam satuan pixel. Jika anda memberikan nilai cellpadding=”2″, maka web browser akan membuat jarak sebesar 2 pixel dari border sisi dalam tabel dengan isi text tabel.
Berikut contoh penggunaan atribut cellpadding dalam tag table HTML:
1 2 3 4 5 6 7 8 9 10 11 12 13 14 15 16 17 18 19 20 21 22 23 24 25 26 27 28 29 30 31 32 33 34 35 | <!DOCTYPE html><html><head><title>Penggunaan atribut cellpadding dalam Tabel</title></head><body><h3>Belajar atribut cellpadding dalam Tabel</h3><table border="1" cellpadding="0"> <tr> <td>Baris 1, Kolom 1</td> <td>Baris 1, Kolom 2</td> <td>Baris 1, Kolom 3</td> </tr> <tr> <td>Baris 2, Kolom 1</td> <td>Baris 2, Kolom 2</td> <td>Baris 2, Kolom 3</td> </tr></table><br /><table border="1" cellpadding="7"> <tr> <td>Baris 1, Kolom 1</td> <td>Baris 1, Kolom 2</td> <td>Baris 1, Kolom 3</td> </tr> <tr> <td>Baris 2, Kolom 1</td> <td>Baris 2, Kolom 2</td> <td>Baris 2, Kolom 3</td> </tr></table></body></html> |
Pengaturan cellpadding yang tepat akan membuat isi text tabel menjadi lebih rapi dan mudah dibaca.
Atribut cellspacing dalam tabel HTML
Atribut cellspacing digunakan untuk mengatur jarak antara garis tepi (border) bagian dalam dan luar.
Nilai dari atribut ini berupa angka yang diukur dalam satuan pixel. Jika anda memberikan nilai cellspacing=”2″, maka web browser akan menampilkan jarak sebesar 2 pixel diantara garis border tabel.
Berikut contoh penggunaan atribut cellspacing dalam tag table HTML:
1 2 3 4 5 6 7 8 9 10 11 12 13 14 15 16 17 18 19 20 21 22 23 24 25 26 27 28 29 30 31 32 33 34 35 | <!DOCTYPE html><html><head><title>Penggunaan atribut cellspacing dalam Tabel</title></head><body><h3>Belajar atribut cellspacing dalam Tabel</h3><table border="1" cellspacing="0"> <tr> <td>Baris 1, Kolom 1</td> <td>Baris 1, Kolom 2</td> <td>Baris 1, Kolom 3</td> </tr> <tr> <td>Baris 2, Kolom 1</td> <td>Baris 2, Kolom 2</td> <td>Baris 2, Kolom 3</td> </tr></table><br /><table border="1" cellspacing="7"> <tr> <td>Baris 1, Kolom 1</td> <td>Baris 1, Kolom 2</td> <td>Baris 1, Kolom 3</td> </tr> <tr> <td>Baris 2, Kolom 1</td> <td>Baris 2, Kolom 2</td> <td>Baris 2, Kolom 3</td> </tr></table></body></html> |
Menggabungkan ketiga atribut tersebut dalam sebuah tabel, maka kita dapat menyesuaikan tampilan tabel sesuai dengan keinginan kita.

Membuat Form di HTML
Pengertian tag <form>
Sebuah form dalam HTML harus berada di dalam tag form, yang diawali dengan <form> dan diakhiri dengan </form>. Tag form akan membutuhkan beberapa atribut untuk dapat berfungsi dengan seharusnya.
Atribut pertama adalah action, yang berfungsi untuk menjelaskan kemana data form akan dikirimkan. Biasanya nilai dari atribut action ini adalah alamat dari sebuah halaman PHP yang digunakan untuk memproses isi data form.
Atribut kedua adalah method, yang berfungsi untuk menjelaskan bagaimana data isian form akan dikirim oleh web browser. Nilai dari atribut method ini bisa berupa get atau post.
Perbedaan method get dan method post adalah, jika kita mengisi atribut method dengan get(dimana ini adalah nilai default seandainya atribut method tidak ditulis) maka isian form akan terlihat pada url browser. Method get ini biasanya digunakan untuk query pencarian. Method postbiasanya digunakan untuk data yang lebih sensitif seperti yang berisi password, atau registrasi user. Data hasil form tidak akan terlihat pada browser.
Struktur dasar form akan terlihat sebagai berikut:
<form action="prosesdata.php" method="post"> ...isi form...</form> |
Mengenal tag <input>
Tag input merupakan tag paling banyak digunakan di dalam form dan memiliki banyak bentuk, mulai dari isian text biasa, text password, checkbox, radio, sampai dengan tombol submit, semuanya dalam bentuk tag <input>.
Bentuk-bentuk dari keluarga tag input ini dibedakan berdasarkan atribut type:
- <input type=”text” /> atau bisa juga <input /> adalah textbox inputan biasa yang menerima input berupa text, contohnya digunakan untuk inputan nama, username, dan inputan yang berupa text pendek. Input type text ini juga bisa memiliki atribut value yang bisa diisi nilai tampilan awal dari text
- <input type=”password” /> dalam tampilannya sama dengan type text, namun teks yang diinput tidak akan terlihat, akan berupa bintang atau bulatan. Biasanya hanya digunakan untuk inputan yang sensitif seperti password.
- <input type=”checkbox” /> adalah inputan berupa checkbox yang dapat diceklist atau di centang oleh user. User dapat memilih atau tidak memilih checkbox ini. Type checkboxmemiliki atribut checked yang jika ditulis atau diisi dengan nilai checked, akan membuat chexkbox langsung terpilih pada saat pertama kali halaman ditampilkan. Contoh inputan checkbox berupa hobi, yang oleh user dapat dipilih beberapa hobi.
- <input type=”radio” /> mirip dengan checkbox, namun user hanya bisa memilih satu diantara pilihan group radio. Type radio ini berada dalam suatu grup dan user hanya bisa memilih salah satunya. Contoh inputan type radio adalah jenis kelamin.
- <input type=”submit” /> akan menampilkan tombol untuk memproses form. Biasanya diletakkan pada baris terakhir dari form. Atribut value jika diisi akan membuat text tombol submit berubah sesuai inputan nilai value.
Mengenal tag <textarea>
Tag textarea pada dasarnya sama dengan input type text, namun lebih besar dan dapat berisi banyak baris. Panjang dan banyak baris untuk text area di atur melalui atribut rows dan cols, atau melalui CSS.
Contoh penggunaan textarea adalah sebagai berikut:
<textarea rows="5" cols="20"> Text yang diisi dapat mencapai banyak baris</textarea> |
Elemen yang berada diantara tag textarea akan ditampilkan sebagai text awal dari form.
Mengenal tag <select>
Tag select digunakan untuk inputan yang telah tersedia nilainya, dan user hanya dapat memilih dari nilai yang ada. Tag select digunakan bersama-sama dengan tag option untuk membuat box pilihan.
Contoh penggunaan tag select adalah sebagai berikut:
<select> <option>Pilihan 1</option> <option>Pilihan 2</option> <option value="pilihan ketiga">Pilihan 3</option></select> |
Ketika form dikirim untuk diproses, nilai dari tag <option> akan dikirimkan. Nilai ini adalah berupa text diantara tag option, kecuali jika kita memberikan atribut value. Jika atribut value berisi nilai, maka nilai value-lah yang akan dikirim. Ada atau tidaknya atribut value ini tidak akan tampak dalam tampilan form.
Tag select memiliki atribut selected yang dapat ditambahkan agar tag select berisi nilai awal. Contoh penggunaanya adalah sebagai berikut:
<select> <option>Pilihan 1</option> <option>Pilihan 2</option> <option value="pilihan ketiga" selected>Pilihan 3</option></select> |
Mengenal Atribut: Name
Setiap tag inputan di dalam form harus ditambahkan atribut name agar dapat diproses oleh web server nantinya. Di dalam halaman proses (yang biasanya berupa bahasa PHP atau ASP), nilai dari atribut name inilah yang akan menjadi variabel form. Contoh pemakaiannya adalah sebagai berikut:
<input type="text" name="username"><input type="text" name="email"> |
Kedua input diatas akan tampak sama persis, namun pada saat pemrosesan data, masing-masing akan dibedakan menurut atribut name.
Sebuah Form Utuh
Merangkum seluruh tag form HTML yang telah kita bahas diatas, maka saatnya untuk membuat sebuah form HTML. Silahkan buka text editor, dan tuliskan kode HTML berikut, lalu save sebagai formulir.html
Contoh penggunaan tag form:
1 2 3 4 5 6 7 8 9 10 11 12 13 14 15 16 17 18 19 20 21 22 23 24 25 26 27 28 29 30 31 32 33 34 35 36 37 38 39 40 41 42 43 44 45 | <!DOCTYPE html><html><head> <title>Belajar Membuat Form </title></head><body><form action=" formulir.html" method="get">Nama: <input type="text" name="nama" value="Nama Kamu" /><br />Password: <input type="password" name="password" /><br />Jenis Kelamin :<input type="radio" name="jenis_kelamin" value="laki-laki" checked />Laki - Laki<input type="radio" name="jenis_kelamin" value="perempuan" />Perempuan<br />Hobi: <input type="checkbox" name="hobi_baca" /> Membaca Buku <input type="checkbox" name="hobi_nulis" checked /> Menulis <input type="checkbox" name="hobi_mancing" /> Memancing<br />Asal Kota: <select name="asal_kota" > <option value="Kota Jakarta"> Jakarta</option> <option value="Kota Bandung">Bandung</option> <option value="Kota Semarang" selected>Semarang</option> </select><br />Komentar Anda:<textarea name="komentar" rows="5" cols="20">Silahkan katakan isi hati anda</textarea><br /><input type="submit" value="Mulai Proses!" ></form></body></html> |
Tampilan form tersebut dapat diubah dengan mudah menggunakan CSS. Perhatikan bahwa untuk atribut target, itu diisi dengan: formulir.html dan atribut method dengan nilai get, sehingga pada saat anda klik kombol mulai proses, perhatikan perubahan pada alamat address bar browser, akan tampil tambahan seperti berikut:
file:///D:/BelajarHTML/formulir.html?nama=Andi&password=rahasia&jenis_kelamin=laki-laki&hobi_nulis=on&asal_kota=Bandung&komentar=Sudah+mahir+html |
Jika diperhatikan dengan lebih lanjut, semua isian form tampak terlihat dari baris ini (karena method form kita set menjadi get) setiap nilai dibatasi dengan karakter dan (&) sedangkan spasi di ubah menjadi karakter tambah (+).
Nah itu semua semoga dipahami dan semoga bermanfaat ya ges ya
Mon maaf bila ada kekurangan next materi selanjutnya ya ges ya
Bila ada yang ingin request boleh di kolom komentar ya
Makasih all
Salam from narumi


